Need to delete a Facebook business page but not sure how to do it? Thankfully, it’s easy to delete a Facebook page from the Facebook website or mobile device–if that’s what you decide is best for your business.

Here’s everything you need to know about:
- The common reasons to delete a Facebook business page
- How to delete a page on Facebook through Meta Business Suite online
- How to delete a Facebook page on mobile
- How to unpublish a Facebook page (if you’re not ready to delete!)
Let’s get started.
3 common reasons to delete a Facebook business page
Before you pull the trigger and delete your Facebook business page, make sure it’s the best decision for your small business. Here are some common reasons businesses consider deleting a Facebook page.
You don’t have time to update your Facebook page
If your Facebook business page has become a digital graveyard that hasn’t been updated in ages, it may be best to leave your Facebook page behind. An old Facebook page that’s languishing without regular updates isn’t doing you or your business any favors–especially if you’re linking to the page from your website or other social media sites.
Plus, if managing your Facebook page is taking too much time away from managing other social media marketing initiatives or all the things that go into running a small business, deleting it may remove a headache from your life. (But if this is the case, we recommend getting help with social media marketing so you don’t have to manage this yourself and can still reap the rewards of a full social media strategy.)
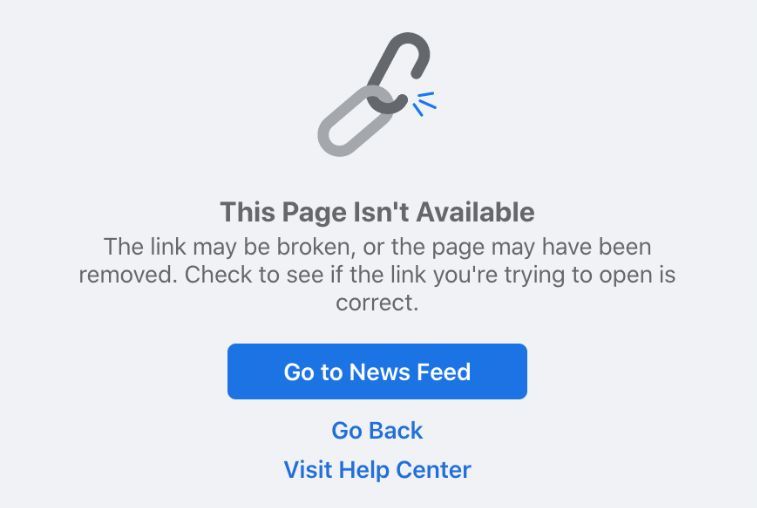
Reminder: If you do decide to delete your Facebook business page, make sure to remove links to it from your small business website and any other places it may be. Or visitors will see this after they click:
⏰ Speaking of time…save some with our Social Media Calendar Template–complete with copy-and-paste social posts!
Your audience isn’t on the platform
The truth is, Gen Z is more likely to spend their time scrolling through TikTok videos than on Facebook. TikTok has 136 million users in the United States, while Facebook has more than 2 billion, according to Statista. But each platform caters to different audiences and generations: Gen Z prefers Snapchat, TikTok, and Instagram, while Millennials use a combination of Facebook, Instagram, YouTube, Twitter, and Snapchat.
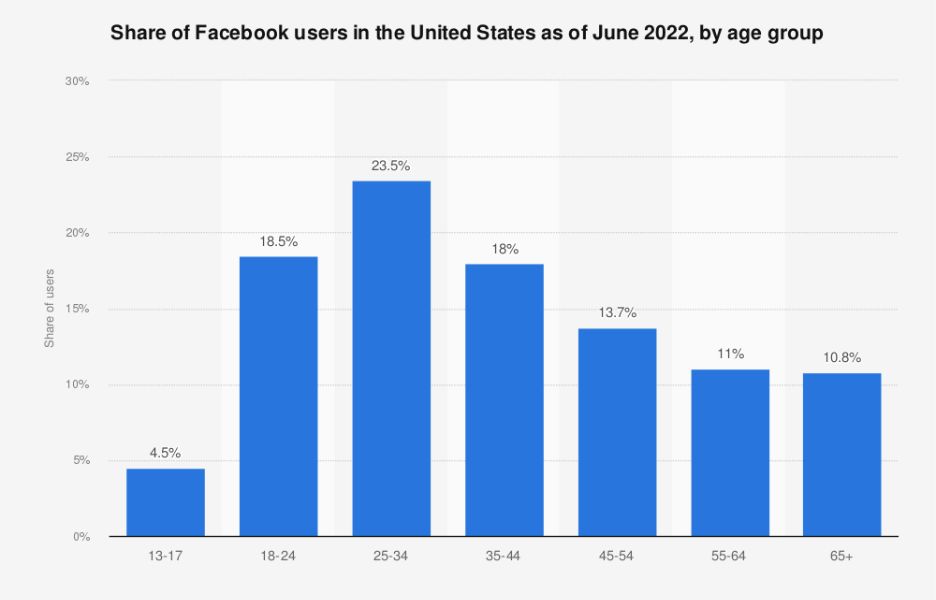
It’s wise to invest your precious time and energy in social media platforms where your audience is. If that’s not on Facebook, you might want to direct your attention elsewhere.
However, Facebook is still a valuable platform, especially for advertising, so you might consider keeping your Facebook business page updated so you have regular updates while running Facebook ads.
If you’re actively posting on Instagram, TikTok, Twitter, or LinkedIn, you can use social scheduling tools to push updates across all social sites.
You found a duplicate Facebook business page
There are times when you might come across a duplicate Facebook page for your business. While you want to get rid of any duplicates, you don’t have to resort to deleting them. You can merge Facebook business pages so you can keep followers from both pages and create one central Facebook page for your business.
🌱 Download our free, editable growth strategy template to walk through seven simple steps for creating the right plan to grow your business.
How to delete a Facebook business page on desktop
To delete any Facebook business page, you’ll need to be an admin of the page. The process of deleting a Facebook page is pretty simple and can be reversed within 14 days. Here’s how to do it on the website in the Meta Business Suite.
Step 1: Download a copy of its contents
Before you delete a Facebook business page, download a copy of its contents. Deleting a Facebook page will permanently delete any photos, posts, and important information that you may want to refer to later.
To download a copy of your Facebook data, simply go to your page and select the “Settings” tab. Scroll down to the “General” section and click “Download Page.” Then click “Request a download.”
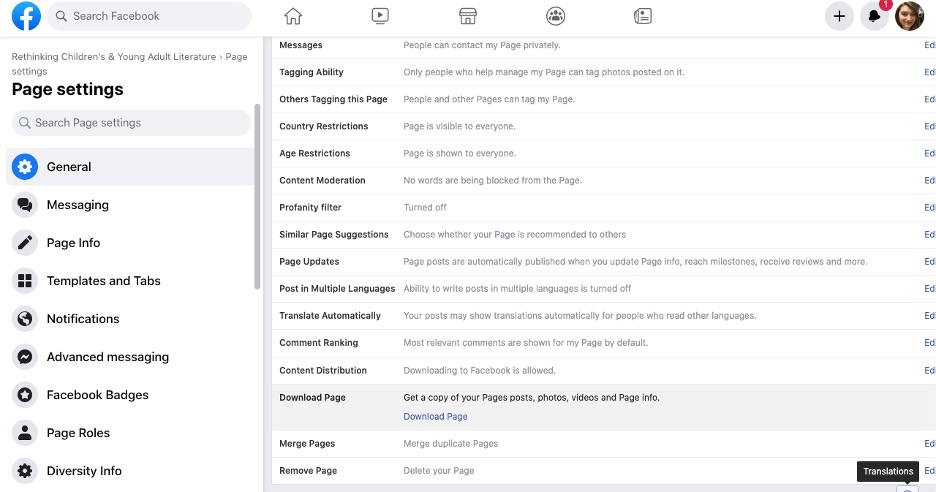
The download will take a few minutes and be sent to your email or arrive as a notification, depending on your privacy settings.
Step 2: Make a final post
Our best advice before deleting a Facebook business page: Create a final post. Let your audience (no matter how small) know that you’re leaving the platform–and where they can find you. You don’t have to provide a reason if you don’t want to, but you do need to let your audience know so there’s no confusion. Composing and publishing your final post should also give you a sense of peace.
Include the following in your final post:
- A thank you note to your loyal customers and audience members for following you!
- A call to action that includes where your audience can find you (both social media accounts and physical location).
- The date your Facebook page will be deleted.
- Optional: the reason why you’re leaving the platform.
Here’s an example of a final post:
- We will be deleting our Facebook page on July 19. While it’s been an amazing experience to connect with you all on here, it’s time to go. Please follow us @YourHandle on Instagram and TikTok. You can always see us in person at [Your Location].
Step 3: Log into your account
Obviously, you’ll want to begin by logging into your account on the Facebook website. If you are not an admin, log into whatever account is an admin for the page. People who are not admins are completely unable to delete Facebook pages.
Step 4: Click the “Pages” tab
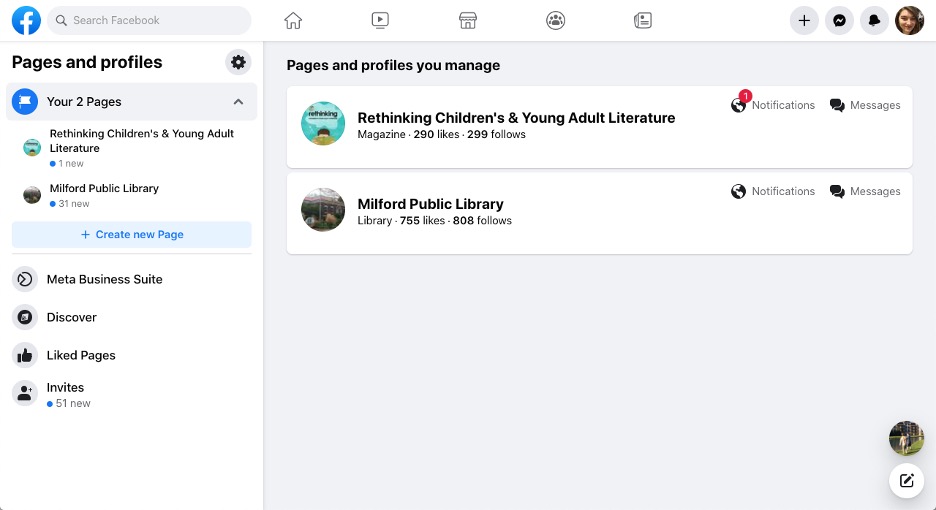
Once you’re logged into Facebook, toggle over to the Pages tab. Click the three horizontal lines in the sidebar menu at the top of the screen, and select “Pages.” The Pages icon is marked with an orange flag. Next, you’ll see a list of the pages you manage. Select the page you’d like to delete.
Step 5: Click the “Settings” tab
Now that you’ve clicked on your page, scroll through the lefthand sidebar menu until you find the settings tab. Click “Settings” on the left, then select the “General” tab.
Step 6: Scroll down “General” tab to “Remove Page”
Once you’ve clicked the “General” tab, you’ll see “Page Visibility” at the top of the righthand menu. Scroll to the very bottom where it says “Remove Page” in bold and to the right “Delete Your Page.” Click “Delete Your Page.”
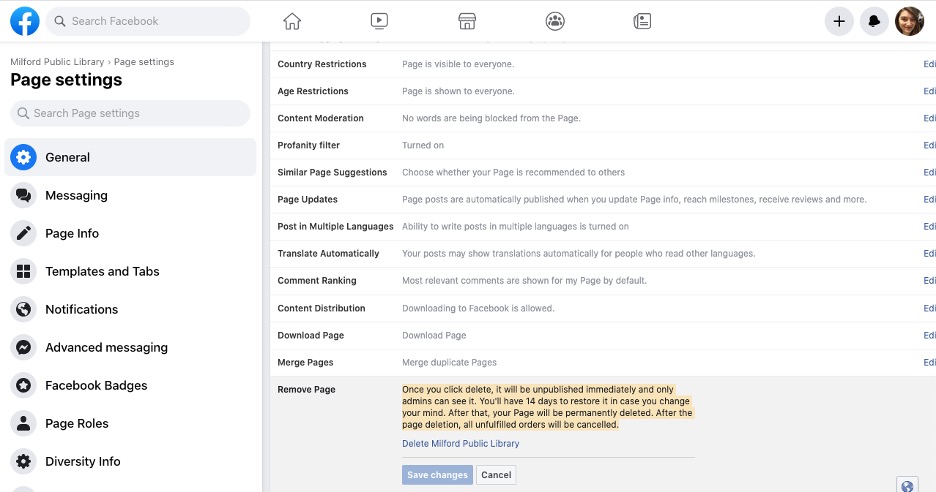
After clicking “Delete Your Page,” Facebook will automatically show the following message: “Once you click delete, it will be unpublished immediately and only admins can see it. You’ll have 14 days to restore it in case you change your mind. After that, your Page will be permanently deleted. After the page deletion, all unfulfilled orders will be canceled.”
Step 7: Click the “Delete [Your Page Name]” hyperlink
You’ll see blue text that says “Delete [Your Page Name].” Click that. A pop-up will appear to double-check that you want to delete your page. Click “Delete Page.”
Step 8: You’ve officially deleted your page!
Next, another pop-up will confirm that you’ve “entered deletion mode.” Now no one can visibly see your page. You can cancel the deletion within 14 days.
[Optional] Step 9: Reactivate your page within a 14-day window
If you decide that deleting was the wrong move, you’ve got two weeks to reverse your decision. Just go to the “General” tab again, and scroll until you see the “Cancel Deletion” button. Click “Confirm” on the next screen. If you don’t reactive the page within 14 days, it will be gone forever.
💡 Get Facebook ideas for every month of the year >> The Only Marketing Calendar You’ll Need
How to delete a Facebook business page on mobile
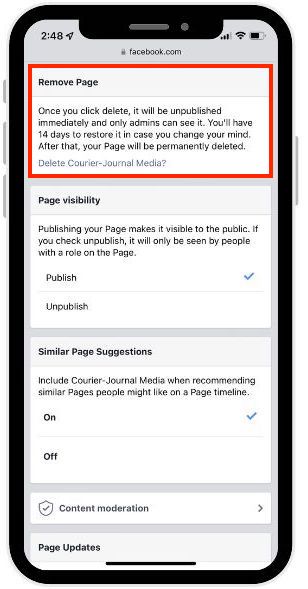
Deleting a Facebook page from your mobile device follows the exact same steps as on a desktop. Here’s how to delete a Facebook business page on your smartphone or mobile device.
- Open the Facebook app and log into your account.
- Tap the three horizontal lines to pull up the right-hand menu. Select “Pages.”
- Toggle over to “Pages You Manage” and select the page you’d like to delete.
- Tap the “Settings” icon and select the “General” tab.
- Scroll down to the “Remove Page” tab.
- Hit “Delete [Your Page Name].”
- Click “Delete Page” in the pop-up.
- Just like on desktop, a pop-up will appear to confirm that you want to delete the page. Tap “OK” to confirm deletion.
- Reactivate within a 14-day window
⭐️ Want ideas, tips, and insights delivered straight to your inbox? Sign up for our newsletter!
How to unpublish a Facebook business page
If you’re not ready to delete your Facebook business page, but want to temporarily hide it, consider unpublishing it instead. When you are about to launch a huge rebrand, unpublishing your page gives you the chance to change your name, profile photo, cover photo, and other elements so your launch is updated all at once (although you don’t have to unpublish in order to make those changes).
Unpublished Facebook pages are not visible to the public—even the people who previously liked your page. An unpublished Facebook business page can only be seen by admins and anyone who manages the page. You won’t lose any previous likes or followers. The process to unpublish a page is simple and similar to deleting a page:
Step 1: Log into your account
Make sure you are logging into an admin account! Only admins can unpublish a Facebook page.
Step 2: Click the “Pages” tab in the lefthand menu
The “Pages” tab is clearly marked with an orange flag on both desktop and mobile. Select the page you need to unpublish.
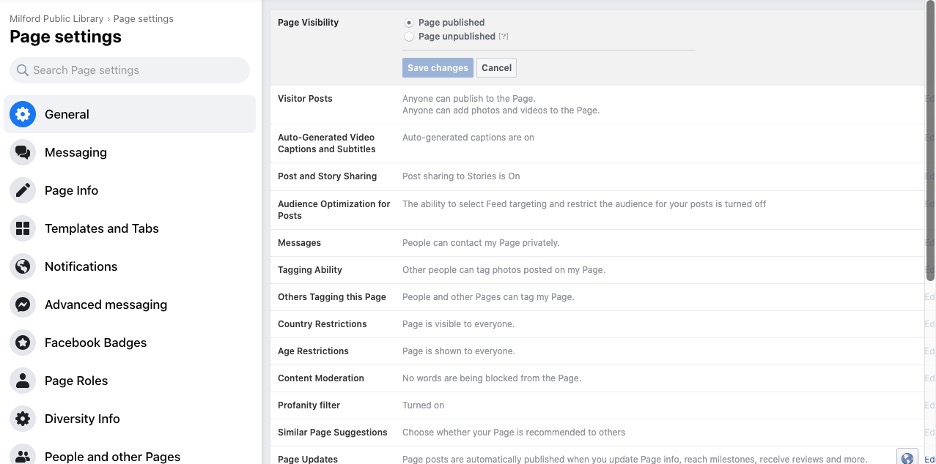
Step 3: Scroll down to the “General” tab and select “Page Visibility”
Under “Page Visibility,” you’ll see two options: “Page published” and “Page unpublished.” Select “Page unpublished.”
Step 4: Click “Save Changes,” “Next,” and “Unpublish”
Next, click “Save changes.” Then click “Next” and “Unpublish.” Now your page has been officially unpublished! You’re all done!
Step 5: Publish the page again
If you’re ready to publish your page again, just follow the above steps but select “Page published.”
Now you know how to delete a Facebook page
Deleting a page on Facebook isn’t difficult to do, but it can be a difficult decision to make. Just remember that there are always other social media platforms out there—if Facebook isn’t the one for you, try Instagram or TikTok instead!


