Adding your location to Facebook is a great way to bring your Facebook marketing to a local level and promote your Facebook page for free. It allows you to connect and interact with customers who are in and around your area. Letting people know where you are also encourages communication at a more intimate level and invites greater engagement. Plus, users who are seeking out posts pertaining to their town or city will easily be able to find your post after using the search bar, so your post may gain traction much more quickly.
You may be asking, “How do I add a location to Facebook?” Thankfully, it’s a lot easier than it sounds, and we’ve got a handy guide (with screenshots!) detailing how to add a location to Facebook–regardless of what or where you’re posting!
Before you get started…
Have you added your location to Google Maps yet? This one is perhaps the most important of them all. Once you have a Google Maps location, you can claim your business on Google, which allows you to edit and update your Google Business profile. Your Google Business profile is what allows you to show up for Maps searches as well as in the local and business results of regular Google search. Get tips for setting up and optimizing your Google Business listing here.
Okay now back to Facebook. Here’s how to add your location to existing photos and posts as well as instructions on how to retroactively add your location.
⭐️ Want ideas, tips, and insights delivered straight to your inbox? Sign up for our newsletter!
Add location to a Facebook photo
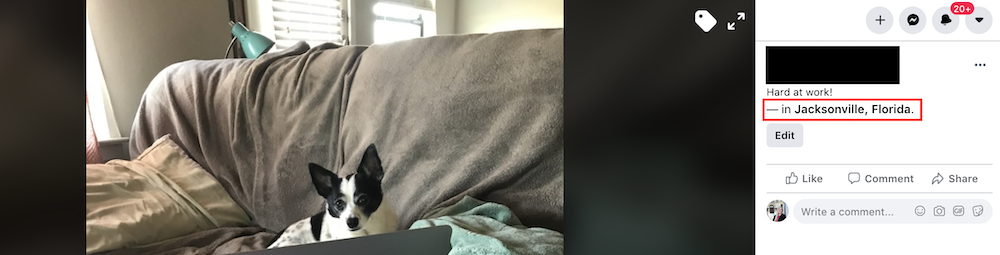
If you are posting a photo, particularly a photo of an event, you may wish to tag it with a location so that viewers know where the photo was taken. People always want to know where an event is being held for example, as the event’s proximity to them will influence whether they go or not.
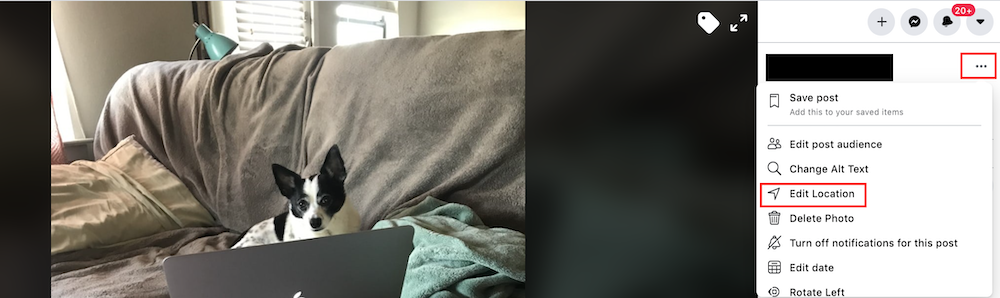
To add a location to a photo, navigate to the photo. Then click the three dots and navigate to “Edit Location.”
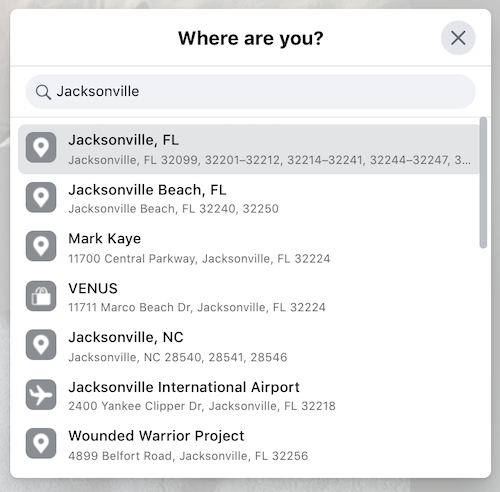
Search for the location you want to tag in your Facebook photo.
Click the image, and voila! You’ve just added a location to a picture on Facebook.
Add location to a Facebook post
Want to know how to add a new location to a Facebook post? You can add a location to a status or post to tell people where you are or where you’re going on your business or personal Facebook page. You can let your audience know that you’re at a specific place, such as a conference hall or park, or simply inform them of your general vicinity, such as the city you are posting from. If you are going somewhere, you can also add the location you are going to. This will display as “traveling to X.” To add a location to a post is quite simple.
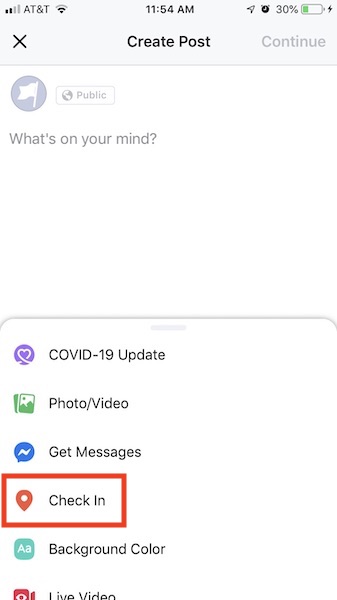
First, write your post. In that same box, click the “Check In” button.
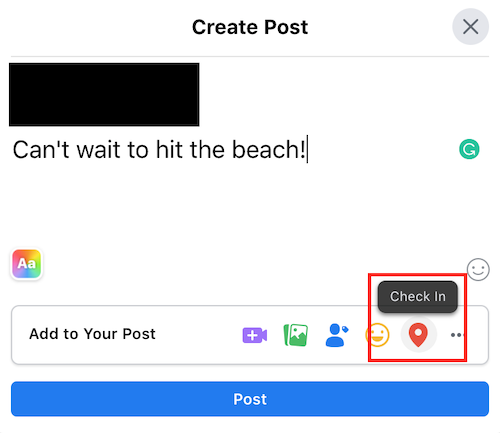
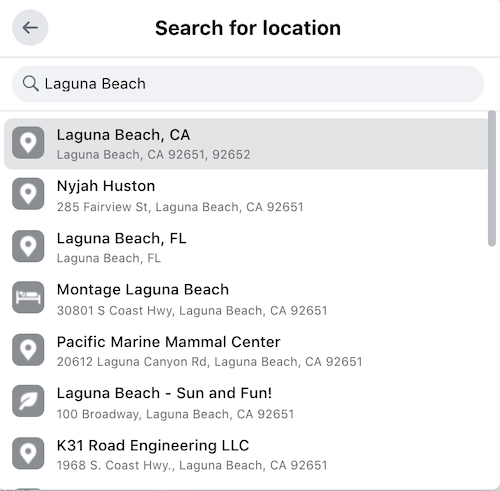
Enter your location’s name or select a suggested location. If your location doesn’t appear anywhere, don’t worry. You can create a location on Facebook instead. Simply type it all out manually. Facebook will accept any location so you can create your own.
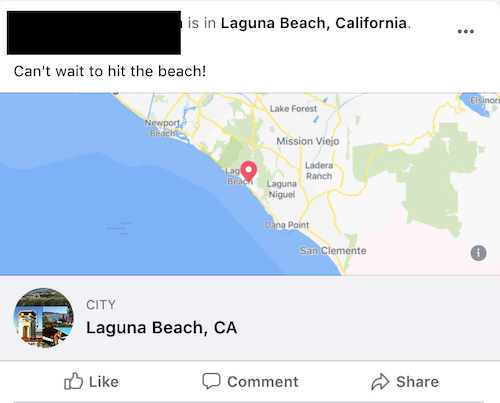
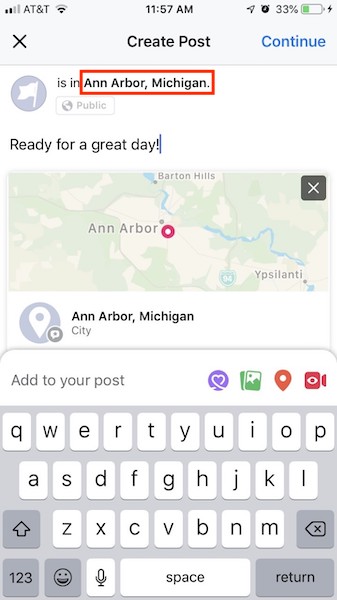
Your end result will look like this:
🚨 Get copy-and-paste social media posts ready for the whole year in our free social media template!
Add location to Facebook posts after posting
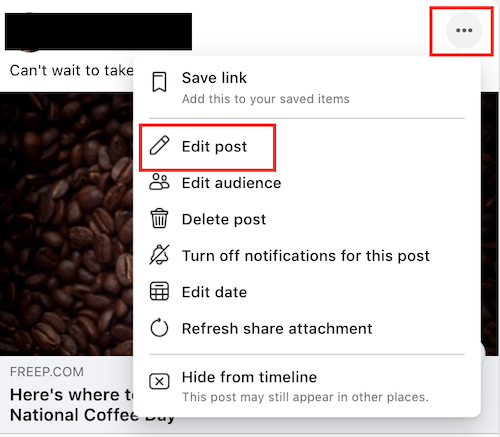
If you’ve already written a Facebook post, but forgot to include a location, don’t fret! Few things online are written in stone, and Facebook posts are no exception. Even if you have already published a Facebook post, you can go back and edit it. To add your location to an existing post, simply go to the post in question. Click the three small dots in the righthand corner, and navigate to “Edit Post.”
Navigate to “Check In,” and then search for your location.
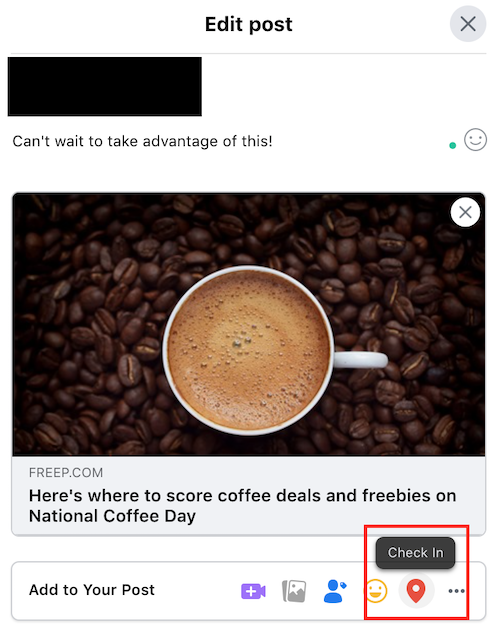
Add your location and click “Save,” and then you’ll see your location added to your post.

This is also what you’d do if you already inputted a location previously but need to edit it for whatever reason.
Add location to a post on Facebook mobile app
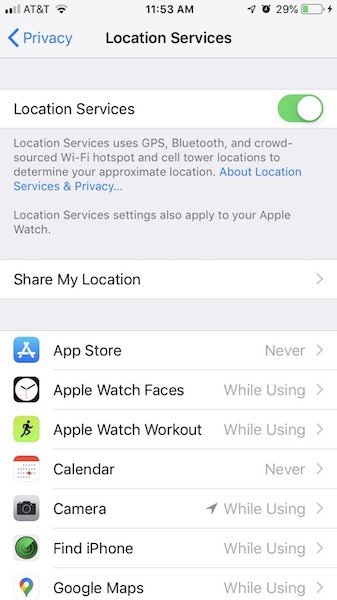
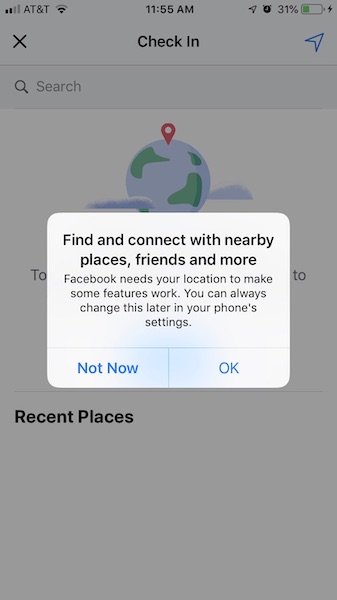
Many people use Facebook solely on their mobile devices, which might be the case for you. The Facebook mobile app comes in handy for on-the-go posting. If you want to add a location on the Facebook mobile app, you’ll first have to do some finagling with your phone. Navigate to your phone’s settings and be sure that Location Services are enabled. This will allow you to fully use Facebook’s location options.
On the Facebook mobile app, navigate to your business page, and click “Create a post.”
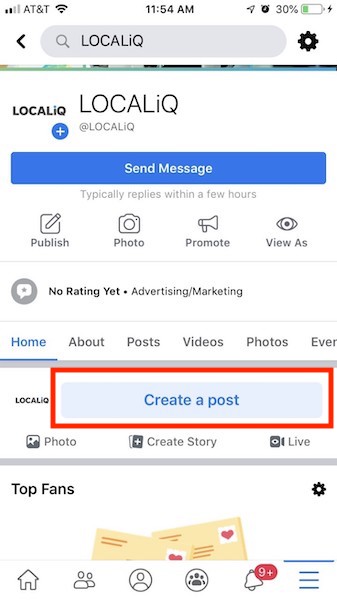
From there, you can choose to “Check In,” which is how you’ll add a location to a post.
Here’s where you can enable location services for Facebook if you haven’t already.
Search for and select your location, complete your post, and hit “Continue” to post.
These are the same steps if you want to add a location to a post on your personal Facebook page as well!
How to add location in Facebook messenger
Facebook Messenger will automatically include your location in the app. Unfortunately, there’s no way to change this location — the Facebook Messenger app will locate your phone via GPS and indicate your location based on where your phone is physically located at that moment. In other words, if you’re typing a message in Dallas, Texas, your messages on the Messenger app will show up as “sent from Dallas.”
While there’s no way to alter your location, you can opt not to include a location in Facebook Messenger at all. If you’re an iPhone user, you’ll have to change your mobile phone’s settings in order to do so. Go to Settings > Location Services, and turn location off for Facebook Messenger.
- Go to Settings.
- Click on Facebook Messenger.
- Click “Location”
- For Location, select “Never.”
Android users are able to disable location from the Facebook Messenger app itself. Simply tap on the menu icon, then hit Settings > Location Services, and uncheck the box that enables location services for the app.
Add business location to Facebook page
If you own a brick-and-mortar business, adding your business address to your Facebook page is a great way to generate buzz because it allows users to check-in when they visit your business or discover you based on your location.
As long as your company’s Facebook page is set up as a business or brand page, you can add an address to your page. Keep in mind that you can only have one address for your page at a time.
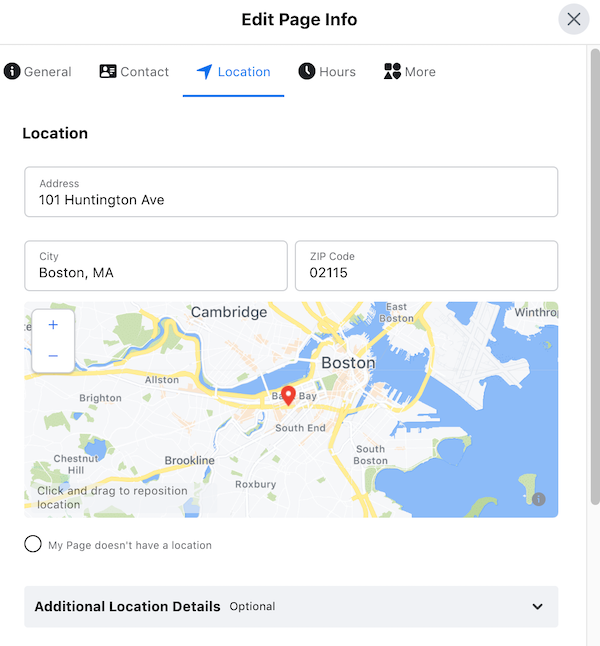
To add an address, click “About” below your Facebook Page’s cover photo. Click on “Edit Page Info” at the top righthand corner.
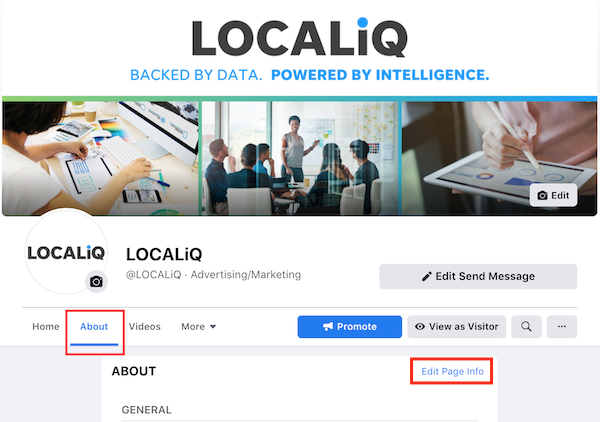
From there, you can click “Location,” and add or edit your address.
You may have previously heard of Facebook Places, which required you to create a separate listing for your business on Facebook that would allow users to check-in. You no longer need to do that if your address is added to your business page on Facebook, but you might notice that other variations of your business exist on Facebook Places. If you want to claim these pages, you can do so using these steps:
- Go to Facebook and search for your business in the search bar. You do not need a GPS-enabled device to do this; you can do this from your desktop.
- If you find a Facebook Place for your business that you don’t own, navigate to the page, and click “Is this your business?” below the cover photo.
- Follow the on-screen instructions to claim the page.
You can also merge the page with an existing Facebook business page you own by claiming the page and following the instructions from Facebook here.
Video tutorial for adding a location on Facebook
There you have it! Now you know how to add a location to your Facebook page and photos on desktop and mobile. Want more help with your social media marketing? Check out these resources below:
- Your Guide to Building Your Social Media Presence
- Do You Know These Social Media Marketing Basics?
- Facebook Advertising for Small Businesses: The Complete Beginner’s Guide